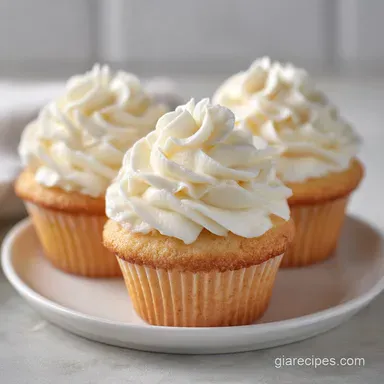
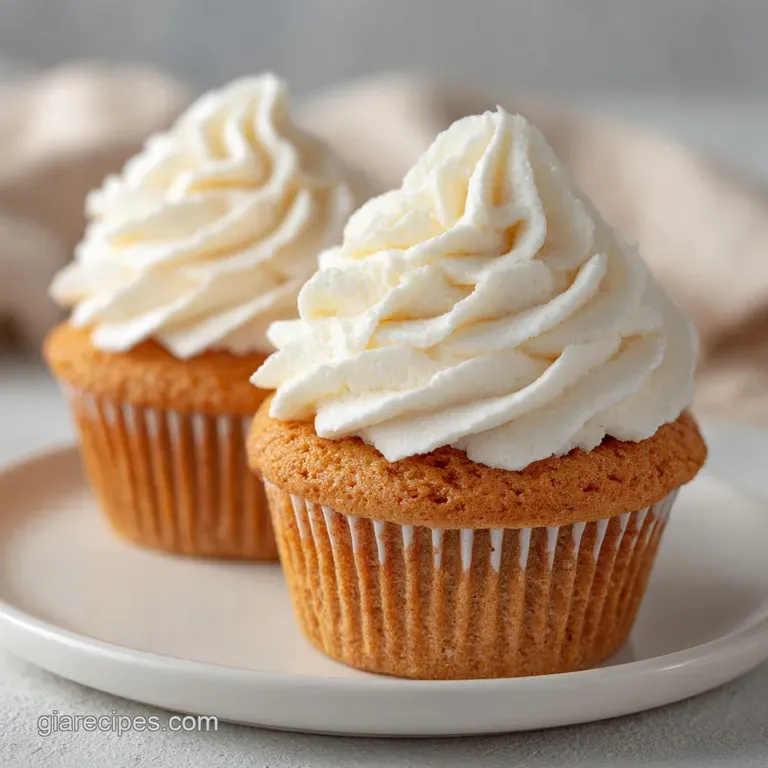
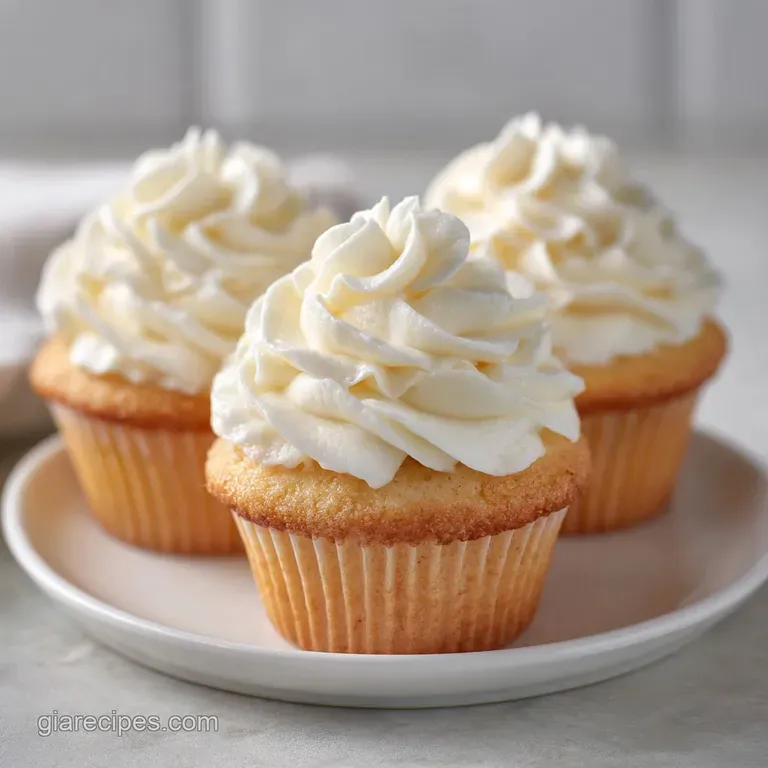
Vanilla Cupcakes: Tender and Light
- Time:15 minutes active + 20 minutes baking = Total 35 minutes
- Flavor/Texture Hook: Velvety buttercream atop a cloud like, buttery crumb
- Perfect for: Birthday celebrations, tea parties, or a romantic weekend treat
Easy Fluffy Vanilla Cupcakes From Scratch
I can still smell the vanilla bean and warm butter drifting through my grandmother's kitchen every Sunday afternoon. In the American South, a vanilla cupcake wasn't just a dessert, it was a gesture of hospitality, a small piece of homemade art served on a floral china plate.
Those cupcakes had a specific, pillowy lightness that felt like a hug in cake form, and they always looked pristine with a swirl of frosting that looked like a sculpture.
Bringing that tradition into my own kitchen meant learning that the magic isn't in a secret ingredient, but in the patience of the process. I remember the first time I tried to rush the butter and sugar, only to end up with a dense, oily cake that felt more like a muffin than a celebration.
It taught me that baking is a slow conversation between heat and air, and that the texture we crave comes from respecting the chemistry of the ingredients.
When you make these easy fluffy vanilla cupcakes from scratch, you're not just following a list of steps, you're crafting a memory. The goal is a crumb that is so light it almost vanishes on the tongue, paired with a buttercream that is silky and stable.
It's an approachable way to master the basics of pastry while creating something that feels truly heirloom.
The Secret to Pillowy Texture
Getting that airy, professional feel doesn't require a fancy bakery, just a few basic principles of how ingredients interact.
Air Incorporation: Whipping softened butter and sugar creates tiny air pockets. These pockets expand in the oven, giving the cake its lift and light feel.
Tender Crumb: Cake flour has less protein than all purpose flour. This means less gluten forms, preventing the cake from becoming chewy or bread like.
Acidity Balance: Buttermilk reacts with baking powder to create a gentle rise. It also breaks down long protein strands, which makes the cake feel more velvety.
Moisture Layering: Using both butter and oil provides the best of both worlds. Butter gives that rich, classic flavor, while oil keeps the cake moist even when refrigerated.
| Method | Time | Texture | Best For |
|---|---|---|---|
| Oven Bake | 20 minutes | Airy and domed | Classic celebrations |
| Stovetop (Steam) | 40 minutes | Dense and moist | over Low heat alternatives |
| Microwave | 2 minutes | Spongy | Single serving cravings |
Component Analysis
Every ingredient here has a specific job. If you change one, you change the soul of the cake.
| Ingredient | Science Role | Pro Secret |
|---|---|---|
| Cake Flour | Lowers gluten | Sift twice for a cloud like crumb |
| Buttermilk | Tenderizes crumb | Keep it at room temp to avoid curdling |
| Unsalted Butter | Provides structure | Soften until it gives way with a light touch |
| Vegetable Oil | Maintains moisture | Use a neutral oil to let the vanilla shine |
The Pantry Essentials
To get this right, you'll want a few specific items. I've found that using high-quality vanilla makes a world of difference in the final aroma.
- 1 1/2 cups (190g) cake flour Why this? Low protein for a softer bite. Substitute: All purpose flour minus 2 tbsp, replaced with 2 tbsp cornstarch. Note: Slightly denser than cake flour.
- 1 cup (200g) granulated sugar Why this? Helps with aeration during creaming. Substitute: Caster sugar. Note: Dissolves faster for a smoother crumb.
- 1 1/2 tsp (7g) baking powder Why this? Primary lift agent. Substitute: 1 tsp baking powder + 1/2 tsp baking soda (add a splash more buttermilk).
- 1/4 tsp (1.5g) salt Why this? Balances the sugar. Substitute: Fine sea salt.
- 1/2 cup (113g) unsalted butter, softened Why this? Classic flavor and structure. Substitute: European style butter. Note: Higher fat content for a richer taste.
- 1/4 cup (60ml) vegetable oil Why this? Long term softness. Substitute: Canola oil. Note: Virtually identical result.
- 2 large eggs, room temperature Why this? Emulsifies the fats. Substitute: 2 flax eggs. Note: Heavier texture, less rise.
- 1 tsp (5ml) pure vanilla extract Why this? The signature aroma. Substitute: Vanilla bean paste. Note: Adds beautiful black specks.
- 1/2 cup (120ml) buttermilk, room temperature Why this? Adds tang and tenderness. Substitute: 1/2 cup milk + 1/2 tbsp lemon juice. Note: Lacks some of the natural thickness.
For the Vanilla Buttercream:
- 1 cup (225g) unsalted butter, softened Why this? The base of the frosting. Substitute: Cultured butter. Note: Adds a sophisticated, slight tang.
- 3-4 cups (360g-480g) powdered sugar Why this? Provides sweetness and stability. Substitute: Non fat dry milk powder (small amount) to reduce sugar. Note: Alters sweetness level.
- 2 tbsp (30ml) heavy cream Why this? Adjusts consistency. Substitute: Whole milk. Note: Slightly less stable peaks.
- 2 tsp (10ml) pure vanilla extract Why this? Deepens the flavor. Substitute: Almond extract. Note: Changes profile to a nutty flavor.
- 1 pinch (0.5g) salt Why this? Cuts the sweetness. Substitute: Fine salt.
The Art of the Bake
Now we get to the magic. I recommend using a stand mixer such as KitchenAid for the creaming process, but a hand mixer works just as well if you're patient.
Phase 1: Prepping the Base
- Preheat your oven to 350°F (175°C) and line a standard cupcake tin with paper liners. Note: Doing this first ensures the batter doesn't sit too long and lose air.
- Sift together the cake flour, baking powder, and salt into a mixing bowl to ensure no clumps remain. Note: Sifting is non negotiable for these easy fluffy vanilla cupcakes from scratch.
Phase 2: The Mixing Process
- Cream the softened butter and granulated sugar together using an electric mixer until the mixture is pale and fluffy, approximately 3 minutes. until the sugar is nearly dissolved and the color is off white.
- Beat in the eggs one at a time, then mix in the vanilla extract and vegetable oil, scraping the sides of the bowl to ensure a smooth emulsion. Note: Adding eggs one by one prevents the batter from breaking.
Phase 3: Folding and Baking
- Alternately add the sifted dry ingredients and the buttermilk to the wet mixture, beginning and ending with the flour. Mix on low speed just until combined. until no streaks of flour remain.
- Fill cupcake liners 2/3 full and bake for 18-22 minutes, or until the tops are pale gold and spring back when lightly pressed. Note: Overfilling will lead to muffin tops that spill over.
Phase 4: The Finishing Touch
- While cupcakes cool completely, whip the frosting butter until creamy, then gradually add powdered sugar one cup at a time on low speed.
- Stir in the heavy cream, vanilla extract, and salt until the frosting is velvety and holds a stiff peak.
- Pipe the buttercream in a spiral motion onto the cooled cupcakes. until you have a smooth, swirling peak.
Chef's Note: For a truly professional look, I love adding color accents. Try a single fresh raspberry on top (Red), a tiny mint leaf (Green), or a few edible gold pearls (Gold) to create a balanced, visually stunning dessert.
Troubleshooting the Batter
Even for experienced bakers, a few things can go sideways. Most issues with easy fluffy vanilla cupcakes from scratch come down to temperature or mixing.
| Issue | Solution |
|---|---|
| Why Your Cakes Are Dense | If your cupcakes feel more like bread than cake, you likely over mixed the batter after adding the flour. Once the flour hits the wet ingredients, gluten begins to form. Too much mixing creates a toug |
| Why Your Centers Sunken | A sunken center usually means the oven door was opened too early, causing a temperature drop, or the baking powder was expired. Ensure your leavening agents are fresh and leave the oven alone until th |
| Why Your Frosting Is Grainy | Grainy buttercream happens when the powdered sugar isn't sifted or when the butter was too cold to incorporate the sugar. Start with truly softened butter and beat the frosting on high for an extra mi |
Mistakes Checklist:
- ✓ Did you sift the flour? (Prevents lumps)
- ✓ Is the butter truly softened, not melted? (Ensures aeration)
- ✓ Did you stop mixing as soon as the flour disappeared? (Keeps it fluffy)
- ✓ Did you let the cupcakes cool completely before frosting? (Prevents melting)
- ✓ Did you use cake flour instead of all purpose? (Ensures tenderness)
Adjusting Your Yield
Sometimes you need a dozen, and sometimes you need five dozen. Baking is precise, so adjustments need to be careful.
Scaling Down (Half Batch): To make about 7 cupcakes, halve all ingredients. For the egg, crack one into a bowl, whisk it, and use exactly 2 tablespoons of the beaten egg. Use a smaller pan or leave gaps between liners to ensure even airflow.
Reduce baking time by about 2-3 minutes, but keep a close eye on them.
Scaling Up (Double Batch): When doubling, don't just double the salt and baking powder; use 1.5x the amount of these to avoid a metallic taste. Work in batches if your mixer is small.
If baking two trays at once, lower the oven temp to 325°F (160°C) and extend the time by 5 minutes to account for the crowded oven.
| Goal | Adjustment | Result |
|---|---|---|
| Extra Moist | Add 1 tbsp sour cream | Heavier but creamier crumb |
| Higher Dome | Increase baking powder by 1/4 tsp | More lift, slightly more fragile |
| Less Sweet | Reduce sugar by 2 tbsp | Less sweetness, slightly less browning |
Common Baking Misconceptions
There are a few things people tell you about cupcakes that just aren't true. Let's clear those up.
The "Room Temperature" Myth: Some say you can just microwave butter for 10 seconds to soften it. Don't do this. Microwave heat is uneven and creates "hot spots" where the butter melts. Melted butter cannot hold air, meaning your easy fluffy vanilla cupcakes from scratch will lose their lift.
The Sifting Myth: Many believe sifting is only for fancy French cakes. In reality, cake flour is prone to clumping. Sifting ensures the baking powder is evenly distributed, preventing those weird "holes" or peaks in your cake.
The Flour Swap: People often think all purpose flour is "just as good." While it works, the protein content is significantly higher. According to King Arthur Baking, the lower protein in cake flour is what creates that specific, tender crumb we associate with professional cupcakes.
Preservation Secrets
To keep these easy fluffy vanilla cupcakes from scratch fresh, you have to protect them from the air.
Storage Guidelines: Store frosted cupcakes in an airtight container. In the fridge, they'll stay good for up to 5 days. However, the butter in the cake and frosting will firm up. For the best experience, let them sit at room temperature for 30 minutes before serving.
Freezing Instructions: You can freeze these! I recommend freezing them without frosting. Wrap each cake individually in plastic wrap, then place them in a freezer bag. They'll stay fresh for 3 months. Thaw at room temperature and frost them fresh for the best taste.
Zero Waste Tips: If you have a couple of cupcakes that didn't quite make the cut (maybe they're a bit lopsided), don't toss them. Crumble them up and use them as a base for cake pops, or layer them with fresh berries and cream in a glass for a quick trifle. If you have leftover buttercream, freeze it in small dollops on a tray, then move them to a bag. They're great for topping a slice of No Bake Chocolate Cheesecake later.
Creative Pairing Ideas
While vanilla is a classic, it's also the perfect canvas for other flavors. If you're serving these at a party, think about what complements the buttery sweetness.
For a refreshing contrast, serve these alongside a bowl of macerated strawberries or fresh raspberries. The acidity of the berries cuts through the richness of the buttercream. If you want something more substantial, these pair beautifully with a cup of Earl Grey tea or a strong dark roast coffee.
If you're looking for another treat to add to your dessert table, a slice of Perfect Libby's Pumpkin Bread provides a wonderful seasonal balance to the light, airy nature of the vanilla.
- 1. Butter Temp
- Your butter should be 65-68°F (18-20°C). It should be cool to the touch but leave an indentation when pressed.
- 2. Creaming Time
- Set a timer for 3 minutes. Don't stop early; the color change to pale ivory is the signal that enough air is trapped.
- 3. Internal Temp
- If you have a meat thermometer, the cakes are done when the center reaches 205-210°F (96-99°C).
Decision Shortcut:
- If you want a flat top for easier frosting: Fill liners exactly 2/3 full and avoid over beating the flour.
- If you want a higher, more dramatic dome: Use 1/4 tsp extra baking powder and ensure your oven is fully preheated.
- If you want a more "velvety" mouthfeel: Replace the vegetable oil with melted (but cooled) browned butter.
Recipe FAQs
Can I use all-purpose flour instead of cake flour?
No, stick with cake flour. Its lower protein content is what ensures the cupcakes stay fluffy rather than becoming bread like.
Why is the creaming step necessary for the butter and sugar?
It incorporates air to provide a light lift. If you mastered this creaming technique here, apply the same principle to our homemade cookies for a superior texture.
How to prevent the cupcakes from sinking in the middle?
Avoid opening the oven door too early. A sudden temperature drop during the first 15 minutes can cause the structure to collapse before it sets.
Is it true that room temperature eggs and buttermilk don't actually matter?
No, this is a common misconception. Room temperature ingredients create a stable emulsion, preventing the batter from breaking and ensuring a fluffy crumb.
How to store these cupcakes to keep them moist?
Place them in an airtight container at room temperature. They will stay fresh for up to two days before refrigeration is needed to keep the buttercream stable.
Can I freeze the finished cupcakes?
Yes, but freeze them before frosting. Wrap the unfrosted cakes tightly in plastic wrap and foil to prevent freezer burn.
How to fix buttercream that is too runny?
Add powdered sugar one tablespoon at a time. Mix on low speed until the frosting reaches a velvety consistency and holds a stiff peak.
Fluffy Vanilla Cupcakes From Scratch