Snickerdoodle Cookie Bars: Soft and Chewy

- Time:10 minutes prep + 25 minutes cook = 35 minutes total
- Flavor/Texture Hook: A velvety, buttery base topped with a shatter crisp cinnamon sugar crust.
- Perfect for: Holiday gatherings, rainy afternoon tea, or as a sophisticated bake sale contribution.
- Create the Most Decadent Snickerdoodle Cookie Bars
- The Art of the Golden Crusted Center
- How the Layers Stay Fudgy and Soft
- Essential Timing and Yield for Hosting Success
- Selecting the Best Elements for Your Palette
- Essential Tools for Your Baking Sanctuary
- Mastering the Process of Crafting These Gems
- Preventing Disasters Before the Oven Door Closes
- Personalizing the Flavor for Every Special Guest
- Maintaining the Freshness of Every Golden Bite
- Beautiful Ways to Present Your Sweet Creation
- Recipe FAQs
- 📝 Recipe Card
Create the Most Decadent Snickerdoodle Cookie Bars
There is a specific kind of magic that happens on a Tuesday afternoon when the rain is drumming against the windowpane and the house feels just a bit too quiet. I remember one such afternoon when I pulled a tray of these Snickerdoodle Cookie Bars from the oven, and the scent of warm cinnamon and toasted butter didn't just fill the kitchen it seemed to hug the entire house.
It is the kind of aroma that brings people wandering into the kitchen without a word, drawn by the promise of something warm and homemade.
You know that feeling when you crave the tang of a classic snickerdoodle but simply don't have the patience to chill dough and roll thirty individual little balls of sugar? That is where this recipe becomes your best friend.
We are taking those heirloom flavors and transforming them into something more substantial, more buttery, and honestly, a bit more elegant. It is the art of the cookie made approachable for a crowd, without losing that signature crackle on top that makes a snickerdoodle so iconic.
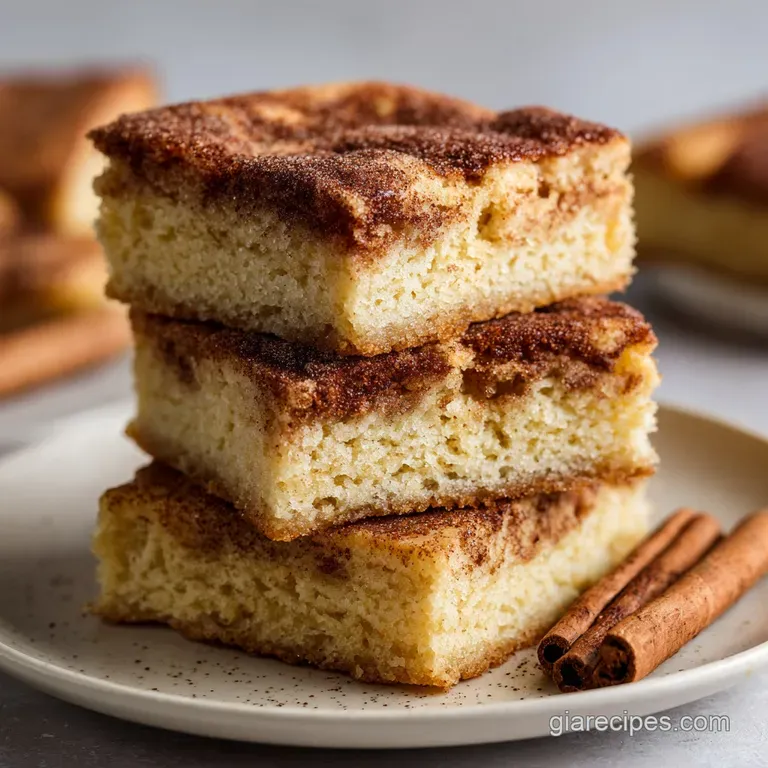
The Art of the Golden Crusted Center
When we talk about this particular dessert, we are looking at a masterclass in texture. Unlike the rounded, often puffy traditional cookie, these bars offer a concentrated chewiness that feels intentional and indulgent.
The surface is where the drama happens; as the sugar and cinnamon bake, they form a delicate, glass like layer that provides a satisfying snap before you reach the soft, almost fudgy interior.
The beauty of the bar format is the contrast. You get the slightly firmer, golden brown edges that have caramelized against the pan, alongside the pale, tender centers that melt away the moment they hit your tongue.
It is a sophisticated take on a childhood favorite, designed to be sliced into neat squares or generous rectangles, ready to be stacked on a vintage platter for your next Sunday brunch or neighborhood gathering.
How the Layers Stay Fudgy and Soft
The success of this recipe isn't just luck; it is about how the ingredients interact when they aren't overworked. We aren't looking for a cakey crumb here; we want density and richness that lingers.
- Fat Saturation: Using melted butter instead of creaming softened butter prevents excess air from entering the dough, ensuring the bars stay dense and chewy rather than light and airy.
- Acidic Reactivity: The cream of tartar provides the signature "tang" but also breaks down the gluten slightly, which results in a softer, more velvety bite.
- Sugar Suspension: A high ratio of granulated sugar to flour creates that classic "crinkle" effect as the bars rise and then settle back down in the heat.
- Delayed Hydration: By folding the flour in last, we keep the starch from absorbing too much liquid too quickly, preserving that tender, melt in-the mouth quality.
| Method | Time | Texture | Best For |
|---|---|---|---|
| Traditional Oven | 25 minutes | Soft center, crisp top | Classic uniform bars and easy cleanup |
| Cast Iron Skillet | 22 minutes | Extra chewy edges, rustic | Serving warm with a scoop of vanilla bean ice cream |
| Convection Bake | 20 minutes | Very crackly surface | Achieving a darker, more caramelized sugar crust |
While the oven is our primary tool, a skillet version can offer a beautiful, rustic presentation if you are serving these immediately for a cozy family dessert. The cast iron retains heat differently, creating a crust that is almost like a toffee bottomed cookie.
Essential Timing and Yield for Hosting Success
When you are planning an event, knowing exactly how much you’ll have and how long it will take is the difference between a stressed host and a relaxed one. This recipe is designed for an 8x8-inch square baking pan, which yields 16 perfectly sized bars that are rich enough to satisfy but small enough to invite a second helping.
| Component Analysis | Science Role | Pro Secret |
|---|---|---|
| Unsalted Butter | Provides fat for tenderness | Melt it gently; don't let it boil or you'll lose moisture through steam. |
| Cream of Tartar | Adds acidity and inhibits sugar crystals | Sift it with the flour to avoid "sour pockets" in your finished bars. |
| Large Egg | Acts as the primary emulsifier | Ensure it is room temperature so it blends seamlessly with the melted butter. |
| Vanilla Extract | Aromatics and flavor depth | Use a full tablespoon; the alcohol evaporates, leaving a floral, rich essence. |
Selecting the Best Elements for Your Palette
To achieve that masterclass finish, the quality of your elements matters. We aren't just throwing things in a bowl; we are selecting components that harmonize to create a specific sensory experience.
- 0.5 cup unsalted butter, melted: Why this? Controls hydration and ensures a dense, chewy texture without excess air.
- 1 cup granulated sugar: Why this? Provides the sweetness and the structural "snap" once baked.
- 1 large egg, room temperature: Why this? Binds the fats and liquids for a glossy, smooth dough.
- 1 tablespoon vanilla extract: Why this? Bridges the gap between the spicy cinnamon and the buttery base.
- 1.5 cups all purpose flour: Why this? The structural backbone; provides just enough protein for a soft chew.
- 1 teaspoon cream of tartar: Why this? Essential for the classic snickerdoodle tang and a tender crumb.
- 0.5 teaspoon baking soda: Why this? Works with the tartar to give a slight, uniform lift.
- 0.25 teaspoon fine sea salt: Why this? Sharpens the sweetness and makes the cinnamon flavor pop.
- 2 tablespoons granulated sugar (for topping): Why this? Creates the characteristic crackle finish on the surface.
- 1.5 teaspoons ground cinnamon (for topping): Why this? The warm, aromatic soul of the entire recipe.
| Original Ingredient | Substitute | Why It Works |
|---|---|---|
| Unsalted Butter | Salted Butter | Adds a savory depth; just omit the extra sea salt from the recipe. |
| All Purpose Flour | gluten-free Blend (1:1) | Most blends contain xanthan gum which mimics the structure well. |
| Granulated Sugar | Light Brown Sugar | Adds moisture and a molasses hint, but the top won't be as crackly. |
Essential Tools for Your Baking Sanctuary
You don't need a kitchen full of high tech gadgets to produce a professional grade result. The beauty of these Snickerdoodle Cookie Bars is their simplicity. I always recommend using a light colored metal baking pan rather than glass; metal conducts heat more efficiently, giving you those crisp edges without overbaking the center.
A sturdy silicone spatula is also your best friend here. You'll use it to fold the dry ingredients into the wet, ensuring you don't activate too much gluten. And of course, parchment paper is non negotiable.
It isn't just about cleaning up; it’s about being able to lift the entire block of bars out of the pan so you can cut them into clean, sharp edged squares.
Mastering the Process of Crafting These Gems
Right then, let's get into the rhythm of the bake. This process is about patience and gentle movements.
- Prepare the environment. Preheat your oven to 350°F (175°C). Line an 8x8-inch square baking pan with parchment paper, leaving an overhang on the sides for easy removal. Note: The overhang acts as handles later.
- Combine the fats and sugars. In a large mixing bowl, whisk together the 1/2 cup melted butter and 1 cup of granulated sugar until well combined.
- Emulsify the wet base. Add the egg and vanilla extract, whisking until the mixture is glossy and smooth.
- Sift for perfection. Sift the flour, cream of tartar, baking soda, and salt directly into the bowl with the wet ingredients. Note: Sifting prevents clumps of leavening agents.
- Fold with care. Use a silicone spatula to fold the ingredients together until just combined, being careful not to overmix. Stop the moment no dry flour streaks remain.
- Anchor the dough. Press the dough evenly into the bottom of the prepared baking pan.
- Create the spice blend. In a small bowl, whisk together the remaining 2 tablespoons of sugar and 1.5 teaspoons of ground cinnamon.
- Apply the crown. Sprinkle this mixture evenly over the top of the dough.
- Bake for transformation. Bake for 22–26 minutes.
- Check for doneness. The bars are done when the edges are set and starting to pull away from the pan, while the center retains a very slight jiggle.
Preventing Disasters Before the Oven Door Closes
Even the most experienced home cooks run into trouble sometimes. The most common pitfall with any bar recipe is the "cakey" texture, which usually happens when the flour is measured too heavily or the eggs are beaten too vigorously.
The Problem of the Sunken Center
If your bars look like a canyon in the middle, it is often a sign that the baking soda was old or the oven door was opened too frequently during the first 15 minutes. Heat fluctuations are the enemy of a level bake.
Avoiding the Dry Crumb
When bars come out crumbly rather than chewy, it is almost always due to overbaking. Remember that "carryover cooking" is real; the bars will continue to set as they cool in the pan.
| Problem | Root Cause | Solution |
|---|---|---|
| Tough texture | Overmixing the flour | Fold by hand only until flour disappears; never use a stand mixer for the dry stage. |
| No "crackle" top | Butter was too hot | Let melted butter cool for 5 minutes before adding sugar so it doesn't dissolve completely. |
| Greasy bottom | Underbaked base | Ensure your oven is fully preheated and use a middle rack for even air circulation. |
Common Mistakes Checklist
- ✓ Check the expiration date on your cream of tartar; it provides the lift and the tang.
- ✓ Use the "spoon and level" method for flour to avoid packing it too tightly in the cup.
- ✓ Let the bars cool completely (at least 1 hour) before slicing to ensure clean edges.
- ✓ Don't skip the parchment paper; it is the only way to get these out without breaking them.
- ✓ Use a sharp knife and wipe it between cuts for that bakery style presentation.
Personalizing the Flavor for Every Special Guest
While the classic version is a masterpiece on its own, there is always room for a little creative expression. I often find that a small adjustment can make this dish feel entirely new for a different occasion.
If you are catering to specific dietary needs, making gluten-free snickerdoodle bars is quite straightforward. I don't have personal experience adjusting recipes for altitude considerations, but I know some other readers have found this high altitude baking chart helpful when navigating mountain air. For gluten-free versions, a high-quality 1:1 flour blend works wonders because the high fat content from the butter keeps the bars moist.
For those looking for dairy-free snickerdoodle cookie bars, you can swap the butter for a vegan butter block (the kind that stays firm when cold). Avoid using liquid oils, as they will change the structure and make the bars too greasy.
If you want a more festive flair, try adding a half teaspoon of ground nutmeg to the cinnamon sugar topping for an eggnog inspired twist.
Maintaining the Freshness of Every Golden Bite
Storage is just as important as the bake itself. Because these bars are moisture rich, they can become soggy if stored improperly or dry out if left exposed.
Storage Guidelines Keep these in an airtight container at room temperature for up to 4 days. If you want to keep them longer, they actually thrive in the fridge for up to a week, though I recommend letting them sit at room temperature for 15 minutes before serving so the butter softens.
Freezing and Zero Waste These freeze beautifully. Wrap individual bars in parchment and then place them in a freezer bag for up to 3 months. If you find yourself with leftover "crumbs" or broken pieces, don't throw them away!
They make an incredible topping for vanilla ice cream or can be folded into a quick bread pudding for a second life.
Beautiful Ways to Present Your Sweet Creation
When it comes to serving, I believe the eyes eat first. Instead of just putting them on a plate, try dusting the platter with a tiny bit of extra cinnamon. If you are serving these at a dinner party, a small dollop of lightly sweetened whipped cream on the side can balance the spice.
The Essential Role of Cream of Tartar
Many people think they can just use extra baking powder, but that is a mistake. The cream of tartar is what gives the Snickerdoodle Cookie Bars their specific personality. Without it, you just have a cinnamon blondie.
It provides the acidity needed to react with the soda for that specific "puckered" surface and soft bite.
The Benefits of Using Melted Butter
By melting the butter, we are essentially creating a denser dough. This leads to a much more satisfying, "toothy" chew. It also makes the recipe incredibly fast, as you don't have to wait for butter to soften on the counter for hours.
Creating a Crackly Sugar Topping
The key to that shatter crisp top is the ratio of sugar to cinnamon. If you use too much cinnamon, it can become gritty. The 2:1.5 ratio in this recipe ensures the sugar can still caramelize and form that delicate crust while the cinnamon provides the deep, autumnal color we all love.
| Problem | Cause | Fix |
|---|---|---|
| Bars are too thin | Pan was too large | Always use an 8x8-inch pan; a 9x9 will make them thin and crispy. |
| Bottom is burnt | Oven rack too low | Move the rack to the center position for balanced heat. |
| Topping is bitter | Old cinnamon | Replace spices every 6-12 months for the brightest flavor. |
If you want X, do Y If you want extra chewy bars, pull them out at the 22 minute mark exactly. If you want a more "old-fashioned" flavor, add a pinch of cream of tartar to the sugar topping as well.
If you want to serve them as a plated dessert, bake them in a round pan and cut them into wedges like a tart.
There is no "secret" to professional baking other than understanding how your ingredients work together. Once you master the gentle fold and the visual cue of the "jiggle," you'll find these bars become a staple in your kitchen, just as they have in mine.
Trust the process, watch your timers, and let the scent of cinnamon lead the way.

Recipe FAQs
Is it true I need to roll the dough into balls before pressing it into the pan?
No, this is a common misconception. You can simply press the dough directly into your parchment lined 8x8-inch pan, which saves you the tedious effort of rolling individual cookies.
How to ensure the bars have that signature tangy snickerdoodle flavor?
Include the cream of tartar in your dry ingredient mix. This specific ingredient provides the classic tang and chewy texture that defines a traditional snickerdoodle.
Can I bake these bars ahead of time?
Yes, you can prepare the dough up to 24 hours in advance. Press the dough into your prepared pan and keep it chilled until you are ready to sprinkle with the cinnamon sugar mixture and bake.
How to tell when the cookie bars are finished baking?
Look for set edges that are pulling away from the pan. Pull the bars from the oven after 22 26 minutes when the edges look firm but the center still retains a very slight jiggle.
Is it necessary to use room temperature eggs?
Yes, using a room temperature egg is recommended. It ensures the egg emulsifies properly with the melted butter and sugar, resulting in a smooth, glossy batter.
How to keep the cinnamon sugar topping from burning?
Stick to the recommended oven temperature of 350°F (175°C). This moderate heat allows the bars to bake through perfectly while caramelizing the cinnamon sugar crust without scorching it.
Why did my bars turn out too dry?
Overmixing the batter is a frequent cause of toughness. Use a silicone spatula to fold the flour, cream of tartar, baking soda, and salt into the wet ingredients until just combined to keep the texture velvety.
Chewy Snickerdoodle Cookie Bars

Ingredients:
Instructions:
Nutrition Facts:
| Calories | 155 kcal |
|---|---|
| Protein | 1.7 g |
| Fat | 6.2 g |
| Carbs | 23.5 g |
| Fiber | 0.4 g |
| Sugar | 14.2 g |
| Sodium | 78 mg |
