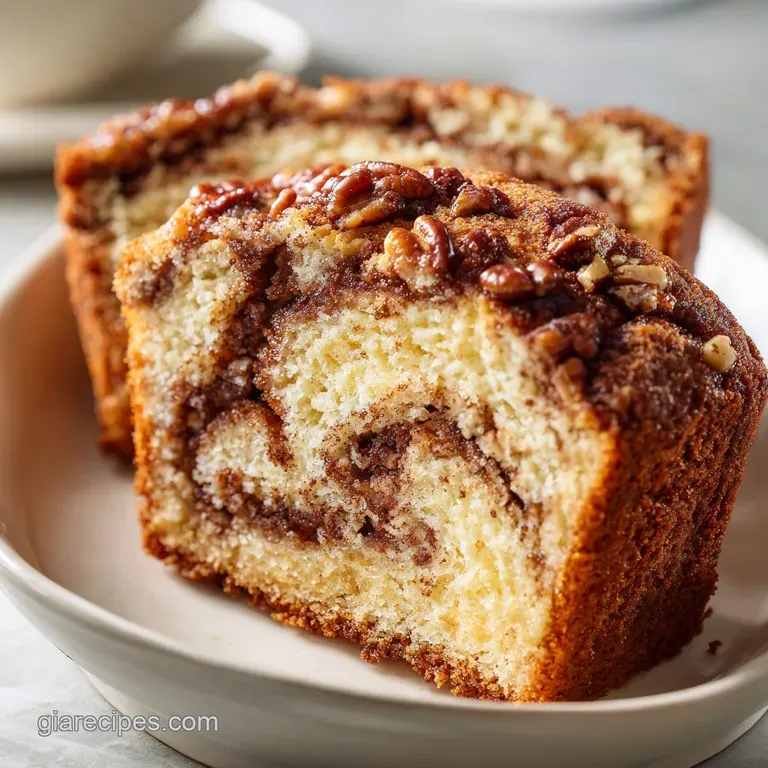
Mini Pumpkin Bread: Cinnamon Swirl and Pecans
- Time:15 minutes prep + 40 minutes baking = 55 minutes total
- Flavor/Texture Hook: Velvety spiced pumpkin with a shattering cinnamon pecan crust
- Perfect for: Holiday gifting, afternoon tea, or brunch hosting
- Mastering My Simple Mini Pumpkin Bread with Cinnamon
- Achieving the Velvety Crumb in Every Mini Loaf
- Component Analysis for Better Baking
- Selecting Quality Spices and Purees for Results
- The Best Tools for Perfectly Proportioned Loaves
- Mastering the Layering and Cinnamon Swirl Technique
- Common Baking Pitfalls and How to Prevent Them
- Creative Twists for Your Personal Pumpkin Bread Art
- Preserving That Fresh From the Oven Spiced Aroma
- Elegant Pairings to Enhance Your Warm Spiced Bread
- Recipe FAQs
- 📝 Recipe Card
Mastering My Simple Mini Pumpkin Bread with Cinnamon
The very first time the scent of this bread filled my kitchen, I knew I had stumbled onto something heirloom worthy. There is a specific kind of magic that happens when ground cloves and nutmeg meet the heat of a preheated oven.
It starts as a faint, earthy sweetness and slowly builds into a rich, aromatic cloud that practically begs you to put on a kettle. I remember watching the first batch through the oven door, seeing the cinnamon sugar swirl begin to bubble and the edges of the pecans turn that deep, golden mahogany.
It was the kind of morning where everything felt right.
We are going for a texture that sits somewhere between a cloud and a pound cake dense enough to feel substantial but with a crumb so tender it almost melts. This is not just another quick bread; it is a lesson in how small choices, like using mini pans, create more of that coveted, slightly crisp outer edge.
Every bite is a balance of the velvety pumpkin base and the deliberate, jagged crunch of a toasted pecan. It is approachable enough for a Tuesday but special enough to wrap in parchment and twine for a dear friend.
When you pull these four little loaves out of the oven, the "shatter" of the cinnamon crust as you slice into them is the ultimate reward. You are not just baking; you are creating a sensory experience that anchors a moment in time.
Whether you are a seasoned baker or picking up a spatula for the first time this season, this process will guide you through the nuance of spices and the art of the perfect swirl. Get ready to fill your home with the most inviting aroma imaginable.
Achieving the Velvety Crumb in Every Mini Loaf
The success of this bread lies in the interaction between moisture and structure. Most people assume all pumpkin breads are the same, but the science of the fats and sugars here is what prevents that dreaded gummy texture often found in vegetable based bakes.
- Emulsion Stability: Whisking the oil, eggs, and pumpkin puree together before adding dry ingredients creates a stable emulsion that suspends fat droplets evenly. This ensures every millimeter of the crumb is equally moist without being greasy.
- Surface Area Dynamics: By using mini loaf pans, we increase the ratio of crust to crumb. The heat penetrates the center faster than a large loaf, which means the outside does not have to overbake while waiting for the middle to set, resulting in a more uniform, velvety interior.
- Hygroscopic Balance: The combination of granulated and brown sugar does more than sweeten; it holds onto moisture. The brown sugar, in particular, adds a hint of acidity that reacts with the baking soda to create a delicate lift and a deeper color.
- Starch Suspension: Tossing the cinnamon swirl pecans in a tiny bit of flour prevents them from sinking to the bottom of the pans. This keeps the "crunch" distributed exactly where you want it right in the middle and on the top.
| Method | Time | Texture | Best For |
|---|---|---|---|
| Standard Oven | 40 minutes | Crisp crust, tender center | Traditional results |
| Convection/Fan | 32 minutes | Extra shattering crust | Rapid baking |
| Toaster Oven | 45 minutes | Very dark, caramelized top | Small batches |
The choice of baking vessel significantly impacts the final result. While a large loaf pan is common, the mini loaves allow for a higher temperature exposure to the cinnamon sugar swirl, which creates a more pronounced "crunch" factor that contrasts beautifully with the soft interior.
Component Analysis for Better Baking
Understanding why we use specific ingredients helps you become a more intuitive cook. It is about more than just following a list; it is about knowing how each element contributes to the final masterpiece.
| Ingredient | Science Role | Pro Secret |
|---|---|---|
| Pumpkin Puree | Provides fiber and humectants | Blot with a paper towel if it looks excessively watery |
| Vegetable Oil | Keeps crumb soft at room temp | Use a neutral oil like grapeseed to let spices shine |
| Baking Soda | Neutralizes acids for browning | Ensure it is less than 6 months old for maximum lift |
| Toasted Pecans | Adds structural contrast | Toast them for 5 minutes before chopping to release oils |
Selecting the right puree is the foundation of this dish. If you need help picking quality pumpkin, check out expert advice from Serious Eats. The texture of your puree will dictate the silkiness of your batter, so look for one that is thick and vibrant rather than pale and runny.
Selecting Quality Spices and Purees for Results
Having everything ready makes the process smoother. Plus, it minimizes the chaos in your kitchen. Speaking of a well prepared baking setup, let's look at what you need to gather for this mini pumpkin bread with cinnamon and pecans.
- 1 cup pumpkin puree: Why this? Puree adds moisture and that iconic earthy base flavor without being too heavy.
- 2 large eggs: Why this? They provide the protein structure needed to hold the bread's lift.
- 1/2 cup vegetable oil: Why this? Oil ensures the bread stays moist longer than butter based recipes.
- 1/4 cup whole milk: Why this? Adds a touch of richness and helps thin the batter to a swirlable consistency.
- 1 tsp vanilla extract: Why this? Acts as a background flavor enhancer for the cinnamon and cloves.
- 1.75 cups all purpose flour: Why this? The reliable foundation that provides just enough gluten for a soft bite.
- 1 cup granulated sugar: Why this? Provides sweetness and helps create the crisp exterior edges.
- 1/2 cup light brown sugar, packed: Why this? The molasses content adds depth and keeps the crumb velvety.
- 1 tsp baking soda: Why this? The primary leavening agent that reacts with the pumpkin's natural acidity.
- 1/2 tsp baking powder: Why this? A secondary lift to ensure the mini loaves don't turn out dense.
- 1/2 tsp fine sea salt: Why this? Essential for balancing the sugars and intensifying the spice profile.
- 2 tsp ground cinnamon: Why this? The star aromatic that defines the autumn flavor profile.
- 1/2 tsp ground nutmeg: Why this? Adds a woody, nutty undertone that complements the pumpkin.
- 1/4 tsp ground cloves: Why this? A pungent spice that provides a long, warming finish.
- 1/4 cup granulated sugar (for swirl): Why this? Creates the gritty, sweet texture within the swirl.
- 1 tbsp ground cinnamon (for swirl): Why this? Concentrated spice for that visual and flavorful "ribbon."
- 1/2 cup chopped pecans, toasted: Why this? Provides an essential earthy crunch to break up the soft texture.
- 1 tsp all purpose flour (for swirl): Why this? Acts as a "glue" to keep the swirl from separating from the bread.
| Original Ingredient | Substitute | Why It Works |
|---|---|---|
| Vegetable Oil | Melted Coconut Oil | Similar fat content; adds a very faint tropical aroma |
| Whole Milk | Oat Milk | The high carb content in oat milk mimics the browning of dairy |
| Chopped Pecans | Walnuts | Similar fat and crunch profile, though slightly more bitter |
If you find yourself missing an item, don't panic. You can often find a suitable alternative in a guide on ingredient substitutions. Just remember that changing the fat or the liquid can slightly alter the final "velvety" feel we are aiming for.
The Best Tools for Perfectly Proportioned Loaves
You don't need a professional pastry kitchen, but a few specific items make this much easier. The mini loaf pans are non negotiable if you want that specific crust to crumb ratio we discussed.
I prefer heavy gauge aluminized steel pans because they distribute heat more evenly than thin, dark pans which can burn the sugar swirl before the center is done.
A good silicone spatula is your best friend here. It allows you to fold the flour into the pumpkin mixture without overworking the gluten. If you overmix, you lose that "velvety" texture and end up with something closer to a rubber ball.
You will also want a couple of mixing bowls one for your dry foundation and one for the wet emulsion. A simple wire whisk is all you need for the wet ingredients; no need to lug out the heavy stand mixer for this one.
Finally,, a wire cooling rack is essential. If you leave the loaves in the pans for too long, the steam trapped underneath will turn the bottoms "gummy." We want the air to circulate around all sides as soon as they are stable enough to move. This preserves that delicate "shatter" of the cinnamon sugar topping.
Mastering the Layering and Cinnamon Swirl Technique
- Prepare the environment. Preheat your oven to 350°F (180°C) and grease four 5.75" x 3" mini loaf pans thoroughly. Note: Greasing into the corners prevents the sugar swirl from sticking.
- Mix the foundation. In a large bowl, whisk 1.75 cups flour, 1 cup granulated sugar, 1/2 cup brown sugar, baking soda, baking powder, salt, 2 tsp cinnamon, nutmeg, and cloves. Whisk until no brown sugar lumps remain.
- Create the swirl. In a small bowl, toss 1/4 cup granulated sugar, 1 tbsp cinnamon, chopped toasted pecans, and 1 tsp flour. Note: This flour prevents the pecans from "diving" to the bottom.
- Emulsify the wet. In another large bowl, whisk the pumpkin puree, eggs, vegetable oil, whole milk, and vanilla extract until the mixture looks glossy and smooth.
- Combine gently. Fold the dry mixture into the wet using a silicone spatula. Stop as soon as the last streak of flour disappears.
- Execute the layer. Fill each pan about 1/3 full with batter, sprinkle a generous layer of the cinnamon pecan mix, then top with remaining batter.
- The final swirl. Sprinkle the rest of the pecan mix on top and use a butter knife to swirl the layers together in a figure eight motion.
- Bake with precision. Bake for 40 minutes. You are looking for a toothpick to come out clean and the tops to feel springy and firm.
- The initial cool. Let the loaves sit in the pans on a wire rack for exactly 10 minutes.
- The final rest. Remove from pans and cool completely on the rack. Wait for the aroma to settle before slicing to ensure the crumb sets properly.
Chef's Tip: For an extra "shatter" effect on the crust, sprinkle a tiny pinch of flaky sea salt over the cinnamon sugar topping right before the pans go into the oven.
Common Baking Pitfalls and How to Prevent Them
Even with the best intentions, baking can throw a curveball. The most common issue people face with pumpkin bread is a "sunken" middle. This usually happens if the oven door is opened too early, causing a sudden temperature drop before the structure has set.
The Gummy Bottom Fix
If you find the bottom of your loaves feels wet or dense, it is often due to "under baking" or leaving them in the pans too long. Pumpkin is heavy; it needs that full 40 minutes to ensure the heat has reached the core.
Always use the toothpick test if it comes out with wet batter, give it another 5 minutes.
Preventing "The Sink"
A bread that rises and then collapses usually has too much leavening or was overmixed. When you overmix, you create too much air and too much gluten strength, which then fails as it cools. Stick to the "just combined" rule.
The Topping Burn
If your pecans are browning too fast but the bread isn't done, loosely tent a piece of foil over the pans for the last 10 minutes. This protects the sugars from scorching while the interior finishes.
| Problem | Root Cause | Solution |
|---|---|---|
| Bread is crumbly | Not enough fat or overbaked | Check oil measurement; reduce bake time by 2 mins |
| Swirl is invisible | Over swirling with the knife | Only do 2-3 figure eight motions |
| Tastes "flat" | Expired spices or missing salt | Use fresh cinnamon; don't skip the sea salt |
Common Mistakes Checklist:
- ✓ Ensure eggs and milk are at room temperature for a better emulsion.
- ✓ Do not use "Pumpkin Pie Filling" it contains extra sugar and water that ruins the ratio.
- ✓ Spoon and level your flour; packing it into the cup makes the bread dry.
- ✓ Check that your baking soda is active by dropping a pinch in vinegar (it should fizz!).
- ✓ Avoid opening the oven door before the 30 minute mark.
Creative Twists for Your Personal Pumpkin Bread Art
Once you have mastered the base, you can start to play with the profile. If you want a deeper, more sophisticated flavor, try adding a tablespoon of dark cocoa powder to the cinnamon swirl. It creates a "mocha pumpkin" vibe that is incredibly impressive.
If you are a fan of chocolate, adding 1/2 cup of dark chocolate chips to the batter (tossed in a little flour first!) is a classic move. For a vegan adaptation, you can swap the eggs for flax seeds (2 tbsp ground flax + 6 tbsp water) and use almond milk.
The texture will be slightly denser, more like a hearty snack cake, but the flavor remains top tier.
The Spice Profile Upgrade
For those who love a "spicier" bread, try adding 1/2 tsp of ground ginger and a pinch of black pepper. The pepper sounds strange, but it acts as a bridge between the nutmeg and the cloves, making the warmth feel more three dimensional.
| Variation | Change | Outcome |
|---|---|---|
| Bourbon Pumpkin | Add 1 tbsp bourbon to wet | Adds a smoky, caramel like finish |
| Pepita Crunch | Swap pecans for pumpkin seeds | Nut free; provides a greener, earthier flavor |
| Maple Glazed | Drizzle maple syrup after cooling | Adds a sticky sweetness and extra shine |
Preserving That Fresh From the Oven Spiced Aroma
Storage is key to maintaining that velvety texture. At room temperature, these loaves stay moist for about 3 to 4 days if wrapped tightly in plastic wrap or kept in an airtight container. In fact, many people (including myself) think they taste better on day two because the spices have had time to "bloom."
For long term storage, these mini loaves freeze beautifully. Wrap each loaf individually in plastic wrap, then place them all in a heavy duty freezer bag. They will keep their quality for up to 3 months.
To reheat, let them thaw at room temperature for a few hours, or pop a slice in the toaster oven for 2 minutes to bring back that "shatter" in the crust.
Zero Waste Tip: If you have leftover pumpkin puree (since most cans are 15oz and we only use 1 cup), don't throw it out! You can freeze the leftover puree in an ice cube tray. These "pumpkin cubes" are perfect for dropping into a morning smoothie or stirring into a batch of Easy Fluffy Homemade Pancakes.
Elegant Pairings to Enhance Your Warm Spiced Bread
While this bread is a star on its own, a few simple additions can turn it into a full occasion. A dollop of whipped salted maple butter is the most natural companion. To make it, just whip softened butter with a splash of maple syrup and a heavy pinch of Maldon salt.
The salt cuts through the sugar of the cinnamon swirl perfectly.
For a savory twist, try a thin slice of sharp white cheddar cheese on top of a toasted piece of pumpkin bread. The tang of the cheese against the nutmeg and cloves is a classic combination in many parts of the world and makes for a sophisticated snack. If you’re looking for more baking inspirations, check out resources from King Arthur Baking or Food Network.
Myths of the Kitchen
One common myth is that you must use butter for the "best" flavor in pumpkin bread. In reality, oil is superior for texture because it remains liquid at room temperature, ensuring the bread doesn't feel "stale" or hard when it's not warm.
Another myth is that more spice is always better; too much clove can actually numb the tongue, so stick to the measurements for that balanced, velvety finish! Happy baking!

Recipe FAQs
How do you adjust baking times for mini loaf pans?
Bake for exactly 40 minutes at the specified temperature. Mini loaf pans have a larger surface area relative to the batter volume, which ensures these reach a golden, set crumb in this timeframe without drying out.
What are common pumpkin bread mistakes?
Overmixing the batter is the most frequent error. Once you fold the dry flour mixture into the wet ingredients, stop immediately once the streaks of flour disappear to keep the crumb tender rather than rubbery.
How many mini loaves equal a regular loaf?
Four mini loaves are equivalent to one standard loaf. This recipe is scaled specifically to yield four 5.75" x 3" portions, which optimizes the ratio of crispy edges to soft interior.
How full do I fill mini loaf pans?
Fill each pan about two-thirds of the way full. This leaves enough headspace for the bread to rise properly without spilling over the edges of the mini loaf pans during the 40-minute bake.
Why did my loaves come out dense?
You likely measured the flour by scooping directly from the bag. Always spoon the flour into your measuring cup and level it off with a knife; packing it down adds too much weight, ruining the lift. If you enjoyed achieving this light, aerated crumb, you can apply similar flour handling precision when preparing our Italian Zucchini Sauce to ensure the best consistency.
Can I bake these ahead of time?
Yes, bake and wrap them tightly up to 2 days before serving. Storing them this way allows the spices and pumpkin flavors to intensify and fuse, resulting in an even more moist texture.
How do I know when the mini loaves are finished?
Insert a toothpick into the center of the loaf. If it comes out clean or with just a few moist crumbs attached, the bread is perfectly baked and ready to be transferred to a cooling rack.
Mini Pumpkin Bread With Cinnamon

Ingredients:
Instructions:
Nutrition Facts:
| Calories | 316 kcal |
|---|---|
| Protein | 3.8 g |
| Fat | 14.1 g |
| Carbs | 45.8 g |
| Fiber | 1.6 g |
| Sugar | 30.2 g |
| Sodium | 204 mg |
